5 Tips to Keep Your VPS Safe from Vulnerabilities
As time passes, technology has also grown. Websites have grown more advanced — backends, OAuth2, APIs... and not just plain HTML files hosted on your home computer. But as technology has advanced, your server or hosting project is exposed to more vulnerabilities.
In this blog, I'll share 5 tips that you can use on your server with less than an hour of work to prevent others from hacking into your server and stealing your stuff.

Robin Nicholas, Patricia Saunders, The Open Group, Public domain, via Wikimedia Commons
Always Remember Permissions
If you are a long-term Windows user or a home Linux user, permissions to you may seem like a shadow — you would never notice them, but they are always there, always protecting you.
In this section, I will only be covering permissions on Unix-like systems like BSD and Linux, since this is mostly standardized and easy to work with.
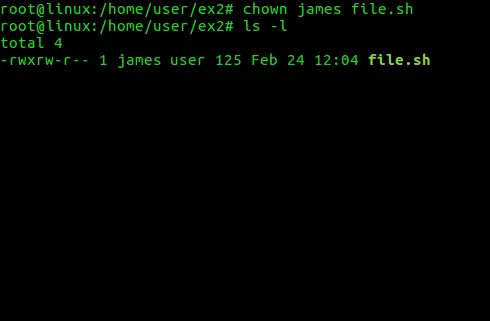
1. Create different users for different things
Users on Unix are key to permissions. They allow you to separate each service on the same machine, so even if a hacker gets into one of your users, they still cannot take control over your entire system.
Fabiorahamim, CC BY-SA 4.0, via Wikimedia Commons
Here is what you can do when setting up your VPS:
- 1 User per Service: Having 1 user per service is best, as it allows you to isolate the different services. For example, if you have a GitLab server and an Nginx server for your website, you can have 2 users named
gitlabandnginx. - Split Directories: For each user, you should have an isolated working directory so that other services and users cannot write to it, by doing
chmod 755 /path/to/your/working/dir. - Protect Sensitive Files: The sensitive files belonging to each user — like API keys and your SSH private key — should not be visible to others. You can set the permissions to
600viachmod 600 your_key.asc, which means only you can read or write to that file, and others will get permission denied.
2. Never use root
The root user on your machine is the administrator with ultimate access to do anything without asking, even removing your entire filesystem with rm -rf /.
If you need to use root permissions to write something like /usr/bin, you should use sudo — a tool designed to let you run specific commands with root permissions, authenticated with your own user's password.
If you are currently using root as your main user, you can switch to your own user with these commands:
# Inside the current root user
adduser YOUR_NAME   # Interactively create the user
passwd YOUR_USER    # Set the password
usermod -aG GROUPS YOUR_USER  # Add your user to groups, like `sudo` and `video`

chown $(whoami):$(whoami) /your/files  # Makes your files "yours"
su YOUR_USER # Switch to your own user
3. Sudo should always need a password
As mentioned earlier, sudo is a very useful tool, but configuring it to not require a password is a very bad idea, because it would give hackers access to your root user without a password.
To make sudo require a password, follow these steps:
- Open the config: Run
sudo visudoto edit the configuration file thatsudoreads. - Edit it: Find the line
<username> ALL=(ALL) NOPASSWD: ALLand remove theNOPASSWDstring, then reload the config file to makesudorequire a password. - Save it: Save the configuration file based on your editor — for example,
:wqin vim. After that, it is best to restart your server to ensure the config is applied.
Firewalls Are Your Friend
After talking about permissions, the next tool that can protect your VPS is firewalls. Firewalls block the connections you don't want and prevent others from accessing the ports you want to keep private.
4. Protect your sensitive services
There are some services on your server that you don't want others to access — like your SSH interface, WordPress admin panel, or private control panel.
This is where the firewall comes in. It acts like a filter that sifts through all the requests trying to reach your services and blocks them before they can get through.
For example, with SSH, you can configure it so that only your IP address can access the SSH service. If others try to SSH into your server, they cannot even reach the login prompt.
The setup depends on which firewall you choose. If you are on FreeBSD, you can use ipfw. Each OS has its own firewall software that you can use.
5. Ban IPs that are on the blacklist
There are lists of IP addresses on the internet that are "blacklisted" because of various malicious actions — such as launching a DDoS attack or other abuses. You can set up an automation script that fetches the list every few minutes and updates your firewall based on it, which can help improve the safety of your server.
Note: Always be careful when working with firewalls — last time I did this, I accidentally locked my SSH service in the firewall, making the VPS inaccessible.
At the End
There are various more advanced ways of keeping your server safe. In this blog, I only scratched the surface and covered the easy things that you can do that make a huge impact on the safety of your server.
Thank you very much for reading.
Apoya la investigación
Dedico unas 6 horas a la semana, fuera de mi trabajo principal, a escribir estos análisis en profundidad sobre C, Java y rendimiento de sistemas. Si mi trabajo aporta valor a tu caja de herramientas de ingeniería, hay dos maneras de apoyar el proyecto:
Apoyo puntual
Una forma sencilla de dar las gracias por una corrección o tutorial. Invítame a un café ($5)
Otras formas de apoyar
Puedes visitar Apoyo para ver más formas de ayudarme y mantener la comunidad del blog.